How I added my Duux Edge Radiator to Home Assistant
I bypassed the Duux Edge radiator's cloud dependency by intercepting its encrypted MQTT traffic and redirecting it to a local broker. This post details how I achieved fully local control in Home Assistant without relying on external servers.
Introduction
I recently purchased a Duux Edge radiator. It features a sleek design and remote app control, but out of the box, it relies entirely on the cloud. As someone who prefers local control for my smart home, both for privacy and reliability, I wanted to integrate it directly into Home Assistant without depending on external servers.
Thanks to some dedicated research by users on the Home Assistant Forum (huge thanks to them!), it was discovered that the Duux Edge uses MQTT over TLS to communicate with Duux’s cloud servers. This opened up an exciting possibility: if we could redirect this traffic, we could potentially trick the device into talking to a local broker instead.
This post documents how I intercepted the device’s cloud communication and set up a local MQTT broker to control the radiator entirely locally, without writing a custom integration or reverse-engineering a custom protocol written in alien language.
A quick note before we dive in: I want to be clear that I am by no means a networking expert. This guide is a documentation of my own journey, put together using various information sources and community wisdom I found online. I don’t claim to have invented this work; rather, I wanted to consolidate this specific workflow to help others. My hope is that this serves as a useful reference for anyone looking to bring “unsupported” or cloud-locked IoT devices into their own local Home Assistant setup.
Disclaimer: This isn’t an attack on Duux. They make great hardware, but I simply prefer my Smart Home to be local.
Understanding the Original Setup
To break free from the cloud, I first had to understand exactly how the radiator talks to the ‘mothership’.
How the OEM Setup Works
By default, the Duux Edge is a cloud-dependent IoT device. Once connected to your Wi-Fi, it establishes an outbound connection to Duux’s servers, allowing the official smartphone app to control it from anywhere. While this is a convenient feature for most users, it introduces latency and reliance on an internet connection.
Older Duux models used the Tuya ecosystem, which allowed for easy integration via existing “Tuya” or “LocalTuya” Home Assistant integrations. However, the newer Edge models have moved to a custom implementation using MQTT.
Quick Introduction to MQTT
MQTT is a lightweight “publish/subscribe” messaging protocol designed for IoT. Instead of devices talking directly to each other, they communicate through a Broker.
- Publish: The radiator sends (publishes) its current temperature or status to a specific “topic.”
- Subscribe: The radiator listens (subscribes) to a “command” topic.
When you press a button in the app, the server publishes a message to that topic, and the radiator reacts.
Initial Network Discovery
To find out where the device was connecting, I monitored my network’s DNS traffic using Pi-hole. Upon booting, the Duux Edge immediately performs DNS queries to resolve the following hostnames:
collector.cloudgarden.nlcollector3.cloudgarden.nl
These are the endpoints for the Duux MQTT cloud brokers. By identifying these, we find the “phone home” destination that I eventually needed to redirect.
Network Sniffing & Traffic Analysis
Performing basic MiTM Attack
To see exactly what the radiator was sending, I performed a Man-in-the-Middle (MiTM) attack using a technique called ARP Poisoning.
On a local network, devices don’t communicate directly via IP addresses; they talk to physical hardware using MAC addresses. They use the Address Resolution Protocol (ARP) to link the two.
Usually, the process is simple:
- The IoT device broadcast a request: “Who has the IP address of the Router?”
- The router responds with its hardware ID: “That’s me! Here is my MAC address.”
- The IoT device saves this mapping in its ARP Table and begins sending data.
The vulnerability here is that ARP is “stateless”—devices will accept an update even if they never asked for it. Using a tool like arpspoof, I sent unsolicited ARP responses to both sides:
- To the Duux Edge: I claimed my laptop was the Router.
- To the Router: I claimed my laptop was the Duux Edge.
Both devices updated their internal tables, unknowingly routing all their traffic through my laptop. By enabling IP forwarding, I allowed the data to pass through to its actual destination so the connection wouldn’t break. This gave me a front-row seat to sniff every packet sent between the device and the server using Wireshark.
Decrypting TLS Traffic
As expected, the initial capture in Wireshark showed nothing but encrypted TLS packets on server-side Port 443. While this is great for security, it’s a hurdle for integration ;).
If you are familiar with basic cryptography (but not with more advanced implementations as TLS, like me), you might think you need the server’s Private Key to decrypt traffic. While that was true for older SSL versions, modern TLS uses Temporary Session Keys. When the device connects to the cloud, they perform a handshake to generate a unique key just for that session.
Because I was sitting in the middle of that handshake (thanks to ARP poisoning), I could capture the “ingredients” used to create that key. By logging this information into a SSLKEYLOGFILE, I could allow Wireshark to decrypt the conversation using these logs.
Note: This works well with TLS v1.2 because the handshake is relatively transparent. Newer protocols like TLS v1.3 use Diffie-Hellman key exchange by default, which hides these keys much more effectively.
Since the Duux Edge device still uses the older TLS v1.2, the door was left just open enough for me to see the raw MQTT traffic hiding inside.
Analysing the Decrypted MQTT Traffic
With the TLS “wrapper” removed, the raw communication was finally exposed. It turns out that the Duux Edge uses MQTT (what a surprise!) at the application layer to handle all its logic.
By filtering the decrypted traffic for MQTT in Wireshark, two main communication patterns emerged.
1. Device State Publishing The radiator is constantly reporting its “health” and current environment to the server. It does this by publishing a message to a specific topic.
- Topic:
sensor/[HWID]/in(where HWID is the MAC-address of the device) - Payload:
1
2
3
4
5
6
7
8
9
10
11
12
13
14
15
{
"sub": {
  "Tune": [
    {
      ...
      "id": 1,
      "power": 0,
      "sp": 20,
      "temp": 16,
      "mode": 0,
      ...
    }
  ]
}
}
In this capture, I could see temp represented the current room temperature, while sp (Setpoint) was the target temperature I had set.
2. Device Command Subscription To receive commands from the app, the radiator subscribes to a command topic. When I pressed buttons in the official app, I saw the server sending simple strings to this topic
- Topic:
sensor/[HWID]/command - Example Commands:
tune set power 0(Off)tune set power 1(On)tune set sp 22(Set target to 22°C)
Creating local MQTT broker
Since the commands are standard text strings, we don’t need to reverse-engineer a binary protocol. We just need to replace the cloud server with our own MQTT broker.
The Plan
Our goal is to create a local “clone” of the Duux cloud server. We know three critical things:
- The protocol is MQTT over TLS.
- The device expects to connect on Port 443.
- We know the Topics and Commands needed for control.
To keep the setup isolated and reproducible, I used Docker running the Mosquitto broker.
Why Docker with MAC VLAN?
In a typical Docker setup, the containers share the host’s IP address. However, our Duux device insists on using port 443. Since this port is the standard for HTTPS, it’s likely already being used by a dashboard, web server or reverse proxy.
By using a MAC VLAN network, we give the Mosquitto container its own unique IP address on your network. This allows the container to have its own “identity”, meaning it can use port 443 without conflicting with anything else on the server.
Step 1: Creating the MAC VLAN Network
Before starting the container, you need to define the network in your terminal. This tells Docker which physical network card to use and which IP range to reserve:
1
2
3
4
docker network create -d macvlan \
  --subnet=192.168.68.0/22 \
  --gateway 192.168.68.1 \
  -o parent=eth0 mqtt5-macvlan
Step 2: Docker Compose Configuration
Using docker-compose.yml makes the setup easy to manage.
1
2
3
4
5
6
7
8
9
10
11
12
13
14
15
16
services:
  mqtt5:
    image: eclipse-mosquitto
    container_name: mqtt5
    networks:
      mqtt5-macvlan:
        ipv4_address: 192.168.68.222 # The dedicated IP for our "Fake" Cloud
    volumes:
      - ./config:/mosquitto/config:rw
      - ./data:/mosquitto/data:rw
      - ./log:/mosquitto/log:rw
    restart: unless-stopped

networks:
  mqtt5-macvlan:
    external: true
Step 3: Configuring Mosquitto
We need the broker to do two things: listen on Port 443 for the Duux device (with TLS) and listen on Port 1883 for Home Assistant (without TLS, for simplicity).
Inside your ./config folder, create mosquitto.conf:
1
2
3
4
5
6
7
8
9
10
11
12
# Plain listener for Home Assistant
listener 1883
protocol mqtt
allow_anonymous true

# Special listener over TLS for the Duux Radiator
listener 443
protocol mqtt
allow_anonymous true
cafile /mosquitto/config/ca.crt
certfile /mosquitto/config/server.crt
keyfile /mosquitto/config/server.key
A note on certificates: Since we are redirecting traffic, we cannot issue a valid public certificate for cloudgarden.nl. Instead, we must generate self-signed certificates. Fortunately, the Duux firmware checks that the connection is encrypted (TLS) but does not strictly validate the Certificate Authority (CA). This allows our “fake” self-signed certificates to work perfectly.
Step 4: Folder Structure
By the end, the setup looked like this:
1
2
3
4
5
6
7
8
9
.
|-- config
|   |-- ca.crt          # Generated Certificate Authority
|   |-- mosquitto.conf  # The config file above
|   |-- server.crt      # Generated Server Certificate
|   `-- server.key      # Generated Server Key
|-- data
|-- log
`-- docker-compose.yml
Redirecting the Cloud Connection
Our broker is running, but the radiator is still trying to phone home to collector.cloudgarden.nl.
To fix this, I used DNS Spoofing. Since I run Pi-hole as my local DNS server, I simply added a Local DNS Record mapping the Duux domains to my new Docker container IP (192.168.68.222).
collector.cloudgarden.nl→192.168.68.222collector3.cloudgarden.nl→192.168.68.222
Now, when the radiator asks “Where is the cloud?”, Pi-hole points it to my local broker. The radiator sees a valid TLS handshake on Port 443, assumes it has reached the server, and connects.
Setup Verification
Before integrating with Home Assistant, I verified the connection using MQTT Explorer.
As soon as I pointed the explorer to my local broker, the radiator appeared!
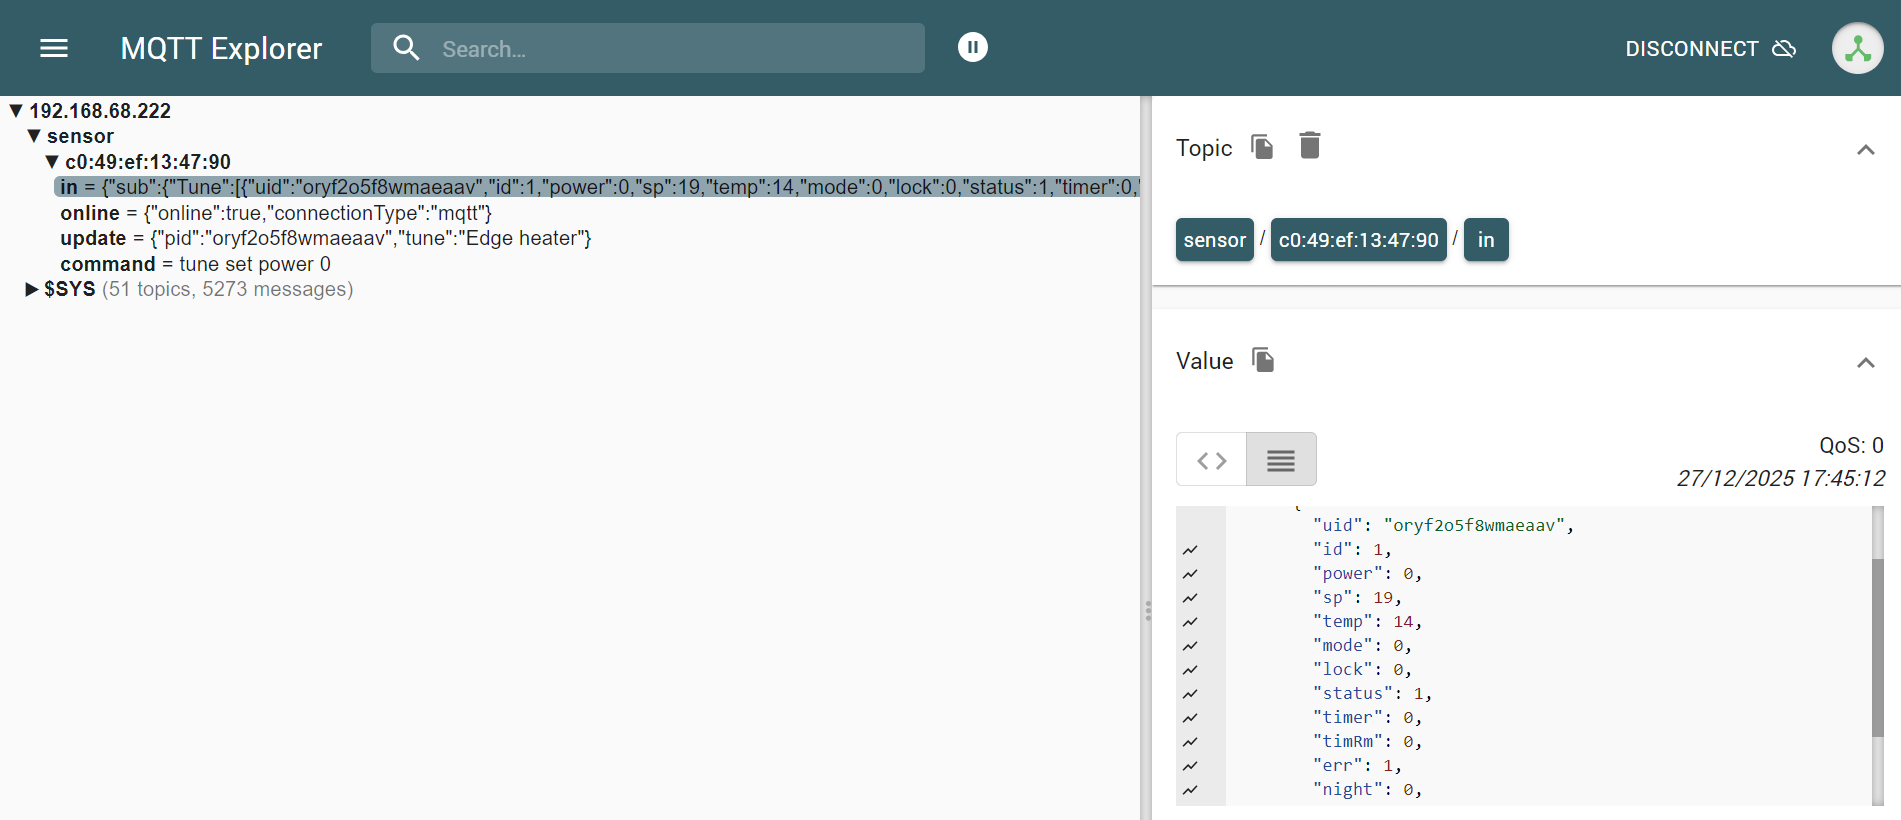
I could see the device publishing its state to the in topic. To confirm control, I manually published a command to the command topic:
tune set power 1
The radiator clicked and turned on instantly. We have local control!
Home Assistant Setup
The final step is to bring this into Home Assistant. This is where the easy integration of MQTT shines.
1. Configuring the MQTT Client
Home Assistant has a popular “Mosquitto Broker” Add-on, which usually acts as the broker for the whole house. However, I purposely chose not to use the Add-on for this specific setup. Because the Duux radiator demands Port 443, using the built-in Add-on would require reserving that port on the Home Assistant host, potentially conflicting with remote access (Nabu Casa, DuckDNS, etc.).
By keeping the broker in an external Docker container (as we set up above), we avoid these conflicts. We simply need to tell Home Assistant to connect to that external broker as a client.
- Go to Settings > Devices & Services.
- Add the MQTT Integration.
- Enter the IP address of the new Docker container (
192.168.68.222) and use the standard Port 1883.
2. Defining the Climate Entity
Since the device doesn’t have “Home Assistant Discovery” built-in, we need to manually define it in our configuration. We will use the MQTT HVAC (Climate) platform.
Add the following to your configuration.yaml (don’t forget to replace the MAC address in the topics with your own):
1
2
3
4
5
6
7
8
9
10
11
12
13
14
15
16
17
18
19
20
21
22
23
24
25
26
27
28
29
30
31
mqtt:
  climate:
    - name: "Duux Edge Heater"
      unique_id: duux_edge_radiator_01

      # Power Management
      # We map '0' to 'off' and '1' to 'heat'
      modes: ["off", "heat"]
      mode_state_topic: "sensor/c0:49:ef:13:47:90/in"
      mode_state_template: >-
        {% if value_json.sub.Tune[0].power == 0 %} off {% else %} heat {% endif %}

      mode_command_topic: "sensor/c0:49:ef:13:47:90/command"
      mode_command_template: >-
        tune set power {% if value == 'off' %}0{% else %}1{% endif %}

      # Target Temperature (Setpoint)
      temperature_state_topic: "sensor/c0:49:ef:13:47:90/in"
      temperature_state_template: "{{ value_json.sub.Tune[0].sp }}"
      temperature_command_topic: "sensor/c0:49:ef:13:47:90/command"
      temperature_command_template: "tune set sp {{ value }}"

      # Configuration Limits
      temperature_unit: "C"
      temp_step: 1
      min_temp: 15
      max_temp: 25

      # Current Room Temperature
      current_temperature_topic: "sensor/c0:49:ef:13:47:90/in"
      current_temperature_template: "{{ value_json.sub.Tune[0].temp }}"
3. How the Templates Work
You’ll notice use of Jinja2 templating in the configuration above. This is necessary because the radiator and Home Assistant speak slightly different languages.
- State Template: The radiator publishes a large JSON object. We use
value_json.sub.Tune[0].tempto extract just the number we need. - Command Template: Home Assistant sends standardized commands (like
heatoroff). The template translates these into the specific strings the radiator understands (e.g.,tune set power 1).
Conclusion
With the entity added and Home Assistant restarted, the Duux Edge is now a fully integrated smart devices in my local Smart Home. No more proprietary cloud, no more external apps, and faster response.
I can now build automations, like turning the heater off automatically when the last person leaves the house (though, of course, I never forget to turn it off manually /s) or pre-heating the room based on my calendar.